Mount Whitney

Mount whitney camping

Photo: Night descends on camp at Iceberg lake with Mt. Whitney in background, Sierra Nevada Mountains, California.  April 2012

Over the weekend my brother and I attempted a quick trip up the Mountaineers Route on Mt. Whitney, California’s highest mountain.  We were a bit rushed on time, with my brother having a motorcycle race starting at 8am on Sunday, and also trying to beat the permit quota which starts today, May 1st.  So We turned around a little short the summit, not being able to commit the time needed and also not acclimatized enough.  This was his first real trip into the mountains so we weren’t looking to push things at all; the mountain isn’t going anywhere anyhow.  Was still a fun trip and wonderful weather.  Conditions this year are super dry, compare to my photos from this time two years ago.

Mount Whitney mountaineers route hiking

Photo: Hiking over rocky terrain of the mountaineers route with Mt. Whitney in the background, Sierra Nevada Mountains, California.  April 2012


Mount Whitney mountaineers route hiking

Photo: Ascending the mountaineers route on Mt. Whitney, Sierra Nevada Mountains, California.  April 2012


Mount Whitney mountaineers route hiking

Photo: Descending the mountaineers route towards Iceberg lake, Sierra Nevada Mountains, California.  April 2012

Mount Whitney

Mount Whitney Sunrise

Photo: Sunrise on east face of Mount Whitney, Sierra Nevada mountains, California.  May 2010

If everything has gone alright, something similar to this should be my view this morning and I should be on the top in a few hours…

Last Journeys Among the Brecon Beacons

Hiking Brecon Beacons national park Wales

Photo: hiking towads Fan Y Big, Brecon Beacons national park, Wales.  Feb 2012

As luck would have it, my final days here in Wales took a turn from the usual gray, rainy days, for a weekend of brilliant sunshine.  Saturday saw us heading up Fan Y Big and Cribyn.  I was hoping to wait around until sunset, but clouds descended late in the afternoon.  I still walked away with over 1100 photos for the day, which for me is quite rare.  The forecast for Sunday was for cloud, but as I was stirring in the morning hours I could see sunshine coming through the blinds.  So instead of going climbing as the original plan had been, we once again took advantage of the weather and headed up to Hay Bluff and wandered a bit down Offa’s Dyke path for a couple hours.

Tonight is my last night in Wales, so I’m glad I got a few final days out in the hills.  Same thing happened last year as well, maybe it’s the California sun trying to welcome me home…

Hiking Brecon Beacons national park Wales

Photo: Big views from Fan Y Big, Brecon Beacons national park, Wales.  Feb 2012


Hiking Brecon Beacons national park Wales

Photo: Heading towards Cribyn, Brecon Beacons national park, Wales.  Feb 2012

Tatra Mountains – Poland

Tatra mountain panoramic photoPhoto: Krivan (Slovakia) rises in the distance, Tatra mountains, Poland

In early November I made a quick visit to the mountains of the Polish High Tatra.  I had been in the region once before, in Feb. 2007, but I never made it into the mountains at the time.  This time around, and with a Polish friend and fellow photographer as a guide, I was looking forward to heading up into the hills.

After an overnight car-bivy in the parking lot we headed out under clear skies into the crisp morning air up the road which forms the first park of any hike in the region.  After a few kilometres we headed into the forest and up the trail towards the Five lakes Valley.  A little before 10am we arrived at the hut where we would stay for the night, right on the edge of a beautiful lake and surrounded by steep mountain peaks.  After a brief rest and some food we headed off with camera’s in hand to go wander about.  With no plan, we headed in the general direction of Zawrat pass arriving some time later.  Being November, there was a bit of snow about, but thanks to an unusually dry and mild autumn for most of Europe in 2011, we were fine in just trail runners and no winter gear.  From Zawrat pass a bit of a scramble along a ridge led us to some small 2,200 meter peak with stunning views back to the Five Lakes Valley and south into Slovakia (where the highest mountains of the Tatra are).  After a bit of time taking some photos, we eventually wandered our way back to the hut a little before sunset.

A side note:  As an American, I have basically no experience with mountain huts.  If I hike in the mountains in California, I carry a tent, tarp, or sleep in the open.  I cook (crappy) food on my little stove and drink from rivers or melt snow.  In winter, I go to sleep in the cold and get dressed in the cold the following morning; my boots usually frozen solid.  Now for Europeans, this is almost barbaric.  As much as I like wilderness and wild camping, I cannot deny that I enjoy the luxury of mountain huts.  Maybe I’m just getting old.  In Poland the huts are fairly cheap by European standards, with dorm bed running around 40 Zloty ($12) and dinner $3-6 (A huge schnitzel, sauerkraut, potatoes, potato pancakes, and a beer cost be about $6 at Morskie Oko hut).  A warm shower after a long day on the trail is probably worth a few dollars alone.  Plus the benefit of the weight savings from not having to carry camping gear means I can either travel lighter than possible back home, or load up on more camera gear.  Probably better to choose the first option…

At 6am the following morning we were on the trail to Morskie Oko.  We had hopes of perhaps trying to get up Rysy, Poland’s highest mountain, but upon closer inspection it would have been a rather dangerous adventure on the icy snow without crampons and ice axe.  After a few hours wandering around the lakes we headed back to the Morskie Oko hut a bit after noon to a shock of surprise.  Hoardes of people.  Everywhere!  A definite change of scene from the 5 people that had been in the Five Lakes hut the day before.  But Morskie Oko is one of the most famous places in Poland.  And the fact that people can be taken by horse drawn carriage the 10km up to the hut, means there is more of a city looking crowd of day tourists filling the dining room.  Luckily they all leave by late afternoon and only a few smelly hikers seem to be left.  After a good dinner it was off to an early night while setting my watch for 4:00 am.

Now, we weren’t getting up at 4:00 am to continue further into the mountains.  It was in hopes of getting to the parking lot before the attendant and thus saving 20 Zloty.  When we had arrived, on a Thursday, the parking attendant got there around 6:00am.  Cool we though, get there a little before that and we should be fine.  So at 4:15 am we left the hut and started the 10 km walk down the road towards the parking lot.  Making near record time, we at the car at 5:30 am and started loading our gear.  Then we saw the light in one of the buildings turn on and the parking attendant man come walking up towards us.  Bugger, I guess someone spends the night on the weekend.  20 Zloty poorer we hit the road.  So much for that genius idea.  Though a bit of luck was on our side as we came across some nice light over the forested foothills a bit down the mountain (the last photo).  Leaving the mountains we headed to Bielsko-Biala to visit a few more friends and spend the day eating pizza at the climbing gym.

Overall, I’m quite impressed with the Tatra.  Though not the highest mountains in Europe, they are rugged and beautiful with a good network of trails and fun scrambles, I’ll definitely be heading back one of these days and wander around for a week or two.


Przedni Staw - Front lake, Five Lakes Valley, Tatra mountains, Poland

Photo: Przedni Staw – Front lake, Five Lakes Valley, Tatra mountains, Poland


View of Wielki Staw - Big lake in Five lakes valley, Tatra mountains, Poland

Photo: View of Wielki Staw – Big lake in Five lakes valley, Tatra mountains, Poland


Tatra mountains poland

Photo: Slovakia – left, Poland – right, High Tatra mountains, Poland


Tatra mountains poland

Photo: View south into Slovakia from near Zawrat Pass, High Tatra mountains, Poland


Dawn tree silhouette in Tatra foothills, Poland

Photo: Dawn comes to Tatra foothills, Poland

Brecon Beacons Wintry Weekend

Brecon Beacons winter hiking

Photo: Snow storm and whitout on Fan Brycheiniog, Brecon Beacons national park, Wales. Dec 17, 2011

Winter arrived in the mountains of Brecon Beacons national park this weekend.  So as the weekend came, and with a friend visiting, it was off to the mountains for a bit of hiking.

Saturday we headed out west to the Black Mountain range for a hike up Fan Brycheiniog.  Well, there was no plan really, but as we arrived on scene to less than ideal conditions, it was obvious that it wasn’t going to be a super long day in the hills.  I had actually been hoping for colder temps to freeze the super-bog of a trail that makes up most of the approach, but nope, not cold enough and the super-bag was as bad as could be.  Not to mention it was covered in a layer of snow so it was difficult to avoid missteps into the mud at times.  The path up the hill hill to Fan Brycheiniog was barely visible and had sections of thigh deep snow drifts.  Once on higher ground, snow stayed about ankle deep for the most part with deeper drifts here and there.  Winds were in the region of 40-50mph once up high, with a face stinging icy snow falling most the time.  It was pretty much impossible to look into the wind, so we had took look down at our feet if walking into the wind – which was the whole way up the mountain. We were more or less in whiteout for most the hike as well, but the clouds cleared from time to time giving a nice view over the frozen land.

Sunday we had plans to hike Pen Y Fan from the south, but the road was too icy to get to the trailhead so we headed to the main parking area on the A470 between Brecon and Merthyr Tydfil.  Conditions down low were mostly calm, but the summits were hidden in cloud.  The forecast for Sunday had been better that on Saturday, but I’m not sure how true this was.  While there was less snow falling, once we reached the gap between Windy ridge and Corn Du, a strong, icy wind made it difficult to walk straight.  Again, conditions were complete a whiteout, even worse than Saturday.  Luckily I know the way quite well or it would have been pretty easy to get lost up there.  And I’m always amazed, especially on Pen Y Fan with its close proximity to larger cities, by the amount of people up there totally unprepared for conditions.  Once we were back down and heading towards Brecon the clouds cleared from the summit for what would have been a nice view at sunset.  Oh well…


Brecon Beacons winter hiking

Photo: Winter conditions near summit of Fan Brycheiniog, Brecon Beacons national park, Wales.  Dec. 17, 2011

Hiking and Travel gear for Lofoten Islands and European Backpacking

I sometimes get asked what gear I carry while traveling, so here’s a list of what I’m taking for 2 1/2 months of travel in Northern Europe from late September till mid December. Ideally I could carry a bit less and travel lighter, but having to carry gear both for camping in the Lofoten Islands and hanging out in Czech cities inevitably leads to some inefficiencies. Normally for a hiking trip, I would not carry anything that I don’t need every day. For mixing Norwegian camping and staying in hostels, this concept doesn’t work especially well. But here it is anyhow. Tomorrow I’ll write about camera gear.

Backpacking gear


Backpacking gear:
Backpack: Golite Odyssey, 90L (5490 in^3) – 47 oz.
Sleeping bag: REI Sub Kilo – 31 oz.
Pad: Thermarest NeoAir – 13.6 oz.
Tent: Big Agnes Fly Creek UL1 – 37 oz.
Stove: Primus TiLite + Titanium pot (.9l) – 9 oz.
Trekking poles: Black Diamond Ultra Distance 10.5 oz. (pair)
Water Purification: Steripen Adventurer – 4 oz.
Total weight:  9 lb. 7.5 oz.  (4.2 kg.)

Gear wise I have to make some small concessions for both cold temps and saving space, so I’m not very close to being ultralight on this trip.  For spring/summer/autumn, a 0˚ C sleeping bag would save some weight.  But from the experience of a night in the mountains on the Swedish – Norwegian border in October a couple years ago, a warmer bag is definitely a safer and more enjoyable option. On the other hand, I’m sure I’ll roast in a few hostel dorms where the punters like to shut all the windows and turn it into an oven of hot stale air and a crescendo of snoring.  On just a hiking trip, I would probably switch the NeoAir pad for a light weigh foam one to save a few ounces.  But foam pads are big and I hate having a bunch of crap strapped to the outside of my bag while walking around cities or hopping on trains.  Plus the NeoAir is way more comfortable anyhow.  Tent is about as light as there is, unless going for a tarp, but when I have to guerrilla camp in sometimes not-so-legit places, I prefer a bit more privacy/protection of a tent.

For staying in cities/hostels, all the camping gear is basically dead weight and unnecessary.  Though generally it’s not a far walk from the train station to the hostel, so it’s not really a problem.  Maybe it’s more of a self-conscious thing; me with a huge old bag and others with small tiny bags of just clothes (and shoes for the stylish peoples).  I always get some weird looks when I have to pull out my tent and dry it over my bunk while everyone else in the dorm is getting fancied up for a night on the town.

Clothing:
Base layer: Patagonia R2
Softshell: Fjalraven
Insulation: Mountain Hardwear Compressor
Shell Jacket: Golite
Shell Pant: Marmot Precip
Pants: MEC lightweight softshell,  REI medium weight soft-shell
shorts
3x t-shirt: 2 cotton, 1 synthetic
3x socks
3x underwear
Gloves
sandals (for hostel showers)
Shoes: Vasque Goretex lined trail runners
Clothing (carry weight):  4 lb.  11 oz. (2.1 kg.)

Again, due to traveling in autumn/winter, I have to pack a bit heavier in the clothing department in preparation for colder temps.  I’ve also had to do a bit of a compromise to cover both hiking and city/hostel life.  If it was a purely hiking trip, I would go a bit lighter with the insulation as I can hike in a light jacket or fleece into below zero temps as long as I’m moving.  But for wandering around cities on a crisp autumn day, I’ll need a bit more insulation.  I chose a hooded softshell jacket over my all time favorite jacket, the Marmot DriClime windshirt, as it fits better with a heavier base layer, the Patagonia R2 jacket.  I figure I’ll have both jackets on pretty much anytime I’m outdoors, so the extra weight shouldn’t matter too much.  While hiking, I shouldn’t overheat too bad in the softshell alone.  I might ditch the rain pants, as I don’t like hiking in the rain anyhow, and with a second pair of pants, if I do get too wet, I can change once at camp.  I carry a super lightweight rain jacket over something a bit heavier that I would wear instead of the softshell as I simply can’t stand wearing hardshell jackets, and will only put one on in a heavy downpour.  I hope I haven’t made a mistake taking trail runners over light boots, but I think I’ll be fine.  Only if there is a considerable amount of fresh snow will it be an issue, so I might run into some problems in the high Tatra mountains, but otherwise, there shouldn’t be too much snow around by mid December (hopefully…).

Other items:
Knife
Headlamp: Petzl Zipka2
Rain cover
Towel
Toothbrush/paste
Biodegradable soap
Earplugs
Hand cleaner

If I wasn’t a photographer, my backpack is actually not too bad for over 2 months of autumn/winter travel mostly in northern Europe.  Next comes the heavy stuff: my camera gear.  Which while I’m trying to pack fairly light and only take a few lenses, it definitely adds some pounds to the backpack.  I’ll talk more about how I carry my camera gear tomorrow.  But basically I keep everything in a normal hiking daypack which can fit inside my larger backpack, as opposed to having a dedicated photo type backpack.  I’ve found this to be a good system in several ways: First, it easily fits inside my larger bag, so while hiking everything is in the one bag and depending on conditions, I may or may not carry my camera in a chest case.  I generally find most photo backpacks to be large and bulky compared to the inside space.  And most aren’t compressible at all due to the thicker padding, so I can’t sort of fold them up to fit is space gets a bit tight.  Second, a hiking daypack is going to be a fair bit lighter (mine is 21 oz. – 600 g.) backpack.  Next, it’s a relatively discreet looking ‘normal’ daypack when walking around cities, nothing that says ‘expensive camera gear inside.’ (and after a few months on the road and the bag gets some nice faded colors going, really looks ghetto then).  It’s more practical for going out on day hikes or short mountain adventures.  Finally, it’s more comfortable to sleep with in hostel beds (yes, I sleep with my backpack). There’s probably a few other benefits as well that I might think of by tomorrow.  But for the benefits gained, I also loose a bit of ease of function with a dedicated photo bag and it’s a bit harder on my gear.  And there are a few companies making photo bags for more adventurous photographers in mind, so I might take a look one of these days and see if there’s anything I could be interested in.

Lofoten Islands Hiking

Reinebringen view Lofoten islands

Photo: View from Reinebringen, Lofoten islands, Norway

I’ve written several post about mountain hikes and camping on the Lofoten islands, but they’re a bit scattered across my blog at the moment so I putting links to them all here in one place.

Reinebringen hiking and info: CLICK HERE.  Reinebringen trailhead is located near Reine, on Moskenesoy.

Justadtinden hiking and info: CLICK HERE.  Justadtinden trailhead is located at Hagskaret, between Leknes and Stamsund on Vestvagoy.

Steinetinden hiking and info: CLICK HERE.  Steinetinden trailhead is located in Stamsund, on Vestvagoy.

Bunes Beach camping and info: CLICK HERE.  The ferry to Bunes Beach is located in Reine, on Moskenesoy.


Justadtinden Lofoten islands

Photo: Summer afternoon on Justadtinden, Lofoten islands, Norway


Lofoten islands hiking Justadtinden

Photo: Saviors of my knees, Justadtinden, Lofoten Islands, Norway

Lofoten Islands Hiking – Steinetinden

steinetinden, stamsund lofoten islands norway

Photo: Winter view from Stamsundheia towards Steinetinden in distance.  Mar 2009

Steinetinden (sometimes called Steinstind, Steinstinden) is a relatively small 509 meter high peak located between Stamsund and Steine on Vestvågøy in the Lofoten islands.  By Lofoten standards its not anything spectacular.  The main attraction of the peak is its close location to the Stamsund youth hostel, about a 5 minute walk across the street for the beginning of the trail.  If you have access to a car, I would recommend setting you’re sights on more aesthetic peaks.  If you just got off the Hurtigruten in Stamsund, are lucky enough to have some fair weather, then Steinetinden is the perfect introduction to what the Lofoten Islands have to offer.  The views aren’t bad, just not as good as elsewhere on the islands.

Location:
Steinetinden is the highest peak along the circular mountain ridge towards the east of Stamsund.  The most direct and straight forward way is walk up ‘Ringveien’ street which is located across from the Joker market.  From Ringveien one has several options.  One way is to turn on Halsbakken street and continue walking east towards the mountain.  When you see a yellow house with what looks like a parking area  for 2-3 cars in the street before it, head into the bushes at the back of the parking area.  You should detect a faint and probably overgrown trail.  This way will take you up and over Mannfallet first.

Otherwise, from Ringveien take the pathway into the forest at the back of the road that heads towards the lakes (this is also the cross-country ski route in winter).  After several hundred meters on the trail, there should be a sign and a small trail coming from the left.  Once on this trail, there are also two options when one comes to the fork.  Towards the left takes one up the middle peak of Mannfallet (308 meters), towards the right the trail continues through the forest and up a steep, often muddy trail towards Steinetinden.  Personally I think hiking up Mannfallet first is the more scenic route, and even slightly easier.  I generally save the steeper, more direct route for the way down, to make a bit of a loop out of things.

Whether going over Mannfallet first or heading direct towards Steinetinden you will eventually find yourself in a flat grassy area between the two peaks.  From here the trail steeply climbs about another 150 meters up to the summit of Steinetinden.

A word of caution:
while for the most part the trail is not anything technical, there are several locations where it passes quite close to high, steep cliffs and one is exposed to a possible fall of 400-500 meters.  In wet conditions the trail can also be quite slippery/muddy.  There are also several short rock steps that need to be negotiated, again with some exposure to a possible long fall. Go with a group of people if possible, and especially if you’re new to mountains.  Be sure to have proper footwear and don’t be afraid to turn around if necessary.

steinetinden, stamsund lofoten islands norway

Photo: Final climb towards summit.  July 2006

steinetinden, stamsund lofoten islands norway

Photo: Summer view from Manfallet towards Steinetinden.  July 2006


steinetinden, stamsund lofoten islands norway

Photo: Spring view from Mannfallet towards Steinetinden.  April 2007

steinetinden, stamsund lofoten islands norway

Photo: A bit of exposure near the summit.  July 2006

steinetinden stamsund lofoten islands

Photo: View of Stamsund from summit. Aug 2010

map

Bryce Canyon National Park

Scenic view of Upper Inspiration Point, Bryce Canyon national park, Utah, USA

Photo: Looking towards viewing platform at Upper Inspiration Point, Bryce Canyon national park, Utah


Originally Bryce Canyon wasn’t on the list of places to visit, but it’s lucky we went as it turned out to be my favorite place on the trip.  I’ve seen tons of pics and generally knew what it looked like, but I didn’t know much else.  Such as it’s at an elevation of 8,000 – 9,000 ft, and there’s lots of snow.  And mostly that it’s just so cool looking in real life, way better than any photo I can take, even when it’s -10˚ C at sunrise.

After leaving the Grand Canyon, to road took us east to Monument Valley, which I’ve never been before.  To me the place was sort of anticlimactic.  I’m glad I went and saw it, but its not any place that I’m itchin’ to get back to.  I don’t really know why.  Perhaps it’s because any possible photo has already been taken 10,000 times, or because of the regulations where you’re not supposed to walk around and explore on your own, or just the ‘tourist farm’ feel of the whole place.

After a night at the campground it was time to head back west, roughly towards Zion np.  We first stopped at Coral Pink sand dunes state park in southern Utah, which was pretty cool looking, especially as there was snow on the dunes.  But the day was young, the sky overcast, and I got a little bored.  On the way to the dunes I saw the sign that said Bryce was 74 miles away.  Ah, what the hell, I thought to myself.  I’m this close already, gas is $1/gal. cheaper in Utah than California, might as well go check it out.

queens garden trail bryce canyon

Photo: Hiking among Hoodoo rock formations of the Queens Garden Trail, Bryce Canyon national park, Utah

Arrived in Bryce Canyon around noon, or was it 1pm, as I never changed my watch for Utah time, don’t even know what they use in Arizona.  Doesn’t matter anyways for a landscape photographer, the sun doesn’t care what time zone you’re in.  The sky was still somewhat hazy so we spent the afternoon getting familiar with the park and trying to decide good sunset/sunrise locations.

The main area of the park, known as the ‘Amphitheater’ is where the most Hoodoo rock formations are.  Not to get into a geological essay here, the Hoodoos are left over sea sediment, eroded my water and freeze/thaw cycles over the years.  What this creates is something amazingly cool and almost surreal to look at.

Dawn on the second day arrived cold, bitterly cold.  Clouds blocked the eastern sky and the day looked like it would remain overcast again.  But luckily by around 8:30am or so, the sky began to clear into a brilliant blue with some nice puffy clouds.  We took a nice morning hike down the short and muddy Queens Garden trail, which travels down in to the amphitheater and wanders among the hoodoos.  It would have been nice to do some other hikes, but a lot of the trails were closed due to the snow or rockfall danger.

In the afternoon, we mostly hung out in the area of Inspiration point.  It was one of those days where I know the light is going to get better later on, but I keep taking photos anyhow because it’s so cool looking.  But Bryce is definitely a better sunrise location, at least the amphitheater area, as it faces east.  In the late afternoon, the sun falls behind the forested slopes on the western side of the amphitheater and the hoodoos are in the shade before the golden hour arrives.  Though once the sun has set, I saw some potential for some nice twilight conditions.

The second morning arrived even colder, and windy this time.  But the sky was somewhat clear towards the east, so there where some brief moments of golden sunlight on the Hoodoos.  Leaving me glad to have stayed another night and thinking about when I can come back again; autumn seems like it would be a nice time…

CLICK HERE: To view more Bryce Canyon images in my photo gallery.

queens garden trail bryce canyon

Photo: Tunnel along Queens Garden Trail, Bryce Canyon national park, Utah

queens garden trail bryce canyon

Photo: Hiking among Hoodoo rock formations of the Queens Garden Trail, Bryce Canyon national park, Utah

Bryce Canyon Hoodoos

Photo: Hoodoo rock formations of the Amphitheater, Bryce Canyon national park, Utah

Bryce Canyon Hoodos and snow

Photo: Hoodoos at sunrise from Sunrise Point, Bryce Canyon national park, Utah

Lake Gjende viewed from Besseggen ridge, Jotunheimen national park, Norway

Hiking the Besseggen Ridge – Jotunheimen National Park, Norway

Hiking the Besseggen Ridge – Jotunheimen national park, Norway

Lake Gjende viewed from Besseggen ridge, Jotunheimen national park, Norway

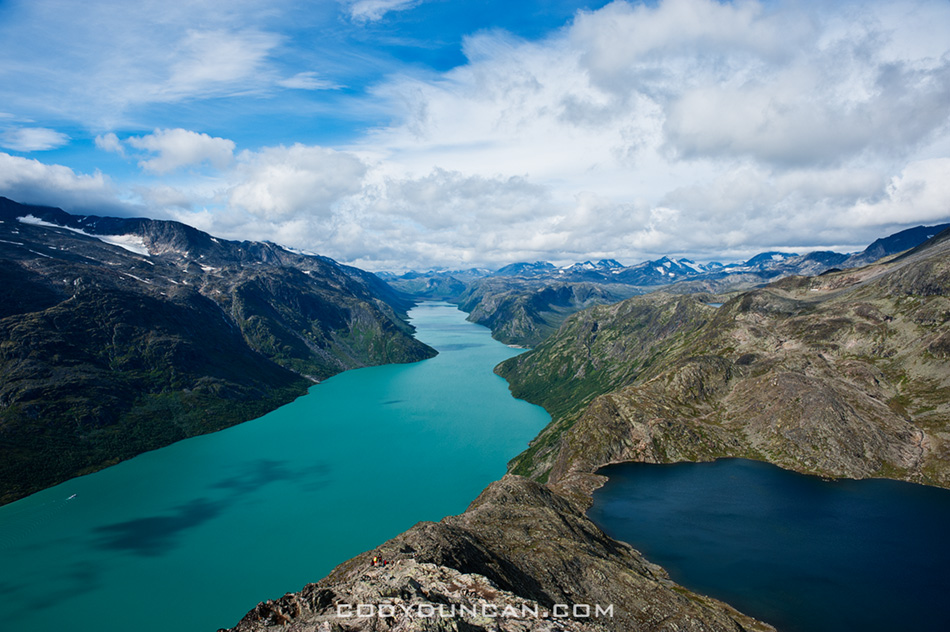
Photo: Lake Gjende and Bessvatnet from Besseggen ridge, Jotunheimen national park, Norway

The Besseggen ridge hike is one of the most popular in Norway, with some 30,000 people making the trek between Gjendesheim and Memurubu each year.  Located in the stunning mountain scenery of Norway’s Jotunheimen national park, the trail roughly follows a ridge on the north side of lake Gjende and provides amazing views of the whole length of the long and colorful lake as it sits surrounded by glaciated mountain peaks.

With a distance of about 8 miles (13 km) and climbing 2,500 feet (759 m) above lake Gjende the hike requires a moderate level of physical fitness.   Expect to take 5-7 hours to complete the hike between Gjendesheim and Memurubu.  The trail is well marked and easy to follow, and due to its popularity, it’s doubtful you’ll be alone – even in bad and rainy weather.

From Gjendesheim, the trail climbs at a moderate gain for several kilometers until finally reaching a high and rocky alpine plateau.  Even if the wind is calm at lake level, it can be cold and windy once up high, be prepared.   The steepest and narrowest section occurs shortly after passing the high point of 5,718 feet (1743 M) – marked with a large cairn.   After this point, the trail then proceeds to quickly drop down to the southern shore of lake Bessvatnet at 4,504 feet (1373m).  Here is were you have one of the best views of Lake Gjende. Lake Bessvatnet represents the approximate half way point and is a good place to sit in the sun (if your lucky) and have a nice lunch.

Continuing from lake Bessvatnet the trail is relatively flat with only moderate climbs/descents until the final short and steep descent to Memurubu and the shores of lake Gjende.

HERE is a good online topo map for all of Norway.  Take a quick look so you can get a bit more comfortable with my descriptions and not mix up Gjende for Gjendebu for Gjendesheim.  Enter either ‘Besseggen’ or ‘Gjende’ in the search box and hit the ‘Kartsøk’ button.  This will get you where you need to look…

besseggen-ridge-norway3

Photo: Ferry leaves Memurubu for Gjendesheim (in far distance)

View of Besseggen ridge and Bessvatnet lake, Jotunheimen national park, Norway

Photo: view east of Besseggen ridge rising above lake Bessvatnet

Day hiking the Besseggen ridge gives one several options on how to go about things and how long of a day is desired.

• Ferry Gjendesheim – Memurubu : Hike Memurubu – Gjendesheim:
A popular way to make the hike is to take the morning ferry from Gjendesheim to Memurubu and make the hike back.  This way has the benefit of not having to meet the ferry schedule for a return trip, thus meaning that one can go as slow or fast as wanted.  One drawback is you will likely be hiking in a crowd of people all arriving with the boat, unless one sits around Memurubu while the crowd continues up the trail.

• Hike Gjendesheim – Memurubu : Ferry Memurubu – Gjendesheim:
This way one can get an early start and have the trail relatively empty.  Though if looking for mountain solitude, I suggest going elsewhere in the park.  The main drawback of this way is that one has to keep schedule to catch the ferry back to Gjendesheim.  Personally, I think the view is more scenic in this direction, and the sun will be at your back during the morning hours.

• Hike Gjendesheim – Memurubu : Hike Memurubu – Gjendesheim:
For a longer day, it’s possible to hike the ridge to Memurubu and back.  Or, to save some tired knees, there is a flat trail that follows the lake, connecting Gjendesheim and Memurubu.

• Ferry Gjendesheim – Gjendebu : Hike Gjendebu – Gjendesheim:
For a long day, take the morning ferry to the end of lake Gjende and Gjendebu and hike back to Gjendesheim.  The section between Gjendebu and Memurubu is relatively uncrowded and provides stunning views of lake Gjende and one approaches Memurubu and also some amazing views of Memurudalen – Memuru valley.

CLICK HERE for ferry schedule
CLICK HERE for ferry prices
CLICK HERE for DNT mountain hut info
CLICK HERE for a topo map of Norway. Search ‘Besseggen’ or ‘Gjende’

lake Gjende ferry

Photo: Ferry and mountain reflections on lake Gjende from Gjendesheim

Overnight trips to the huts:
The lake ferry boat not only carries people, it will also carry luggage.  So, say one is looking to stay overnight at Memurubu or Gjendebu hut, put your luggage on the ferry and hike from Gjendesheim.  When you arrive in Memurubu, your bags will be waiting.  This can also work in reverse, staying your first night in the hut and then hike back to Gjendesheim while your luggage takes the ferry.

Camping:
Wild camping is possible basically everywhere, the only restrictions being the immediate area around the huts.  Water is plentiful and tasty.  On the other hand, finding a flat and dry spot to pitch a tent can sometimes take a bit of searching, but is well worth the effort to sleep with some amazing views out the tent door.

Camping near Gjendesheim.  Walk past the end of the parking area and continue along the lakeside trail for 100m.  Beginning here you you see plenty of places to pitch a tent.  Can get a bit crowded on a nice summer weekend.

Scenic mountain landscape of Jotunheimen national park, Norway

Photo: Alone in the wilderness.  Wild camping in Norway’s Jotunheimen national park

Further into Jotunheimen:
Jutunheimen national park is an amazing place.  I highly recommend making a longer hike through the park, either as a multi-day loop or through hike.  While I enjoy camping in the wild, it’s also possible to carry a light pack and overnight in the well connected network of huts, many of which also serve food.

When to go:
The main summer season in the Norwegian mountains in July and August.  These months will be your best bet for sunny, warm days.

Getting there:
The start or finish of the Besseggen ridge is located at Gjendesheim, on the eastern end of lake Gjende and Jotunheimen national park itself.  Here you’ll find a full service DNT hut, a small (expensive!) shop/cafe, toilets, the ferry boat, and parking area.

By Bus:
Several busses travel to Gjendesheim daily.  The two options are to travel via Fagernes (to/from Oslo) in the south.  To the north the bus travels to Vagamo where one can transfer east to Otta and the train, or continue west through the fjords.

By Train:
There is no direct train link to Jotunheimen national park.  If traveling by train, say from Trondheim in the north, exit at Otta, where you will have to take the bus to Vagamo, then on to Gjendesheim.  The bus/train does not always meet at a convenient time, so be sure to check schedules.

Transportation links:
NSB – Norwegian train company
Nor-Way – Long distance bus routes incl. Olso – Gjendesheim
Ruteinfo – Local and regional bus information
Gjende – Lake Gjende ferry.  Prices and timetable

Other Useful links:
DNT – The Norwegian Trekking Assocaition
Interactive topo map including trails and huts for all of Norway
Norwegian weather

CLICK HERE for more photos of Jotunheimen national park from summer 2010

If there’s anything I seemed to miss, let me know and I’ll try and add it.

View towards Gjendesheim and lake Gjende, Jotunheimen national park, Norway

Photo: Looking towards Gjendesheim on the shore of lake Gjende from near start/finish of Besseggen Ridge trail